
It all started one summer day… just kidding! You can skip to the “recipe” here…
It’s funny that I haven’t written this post before. I’ve done talks and have been a huge proponent for Stucco for a few years. I think I discovered it during one of Brandon Olin’s (aka devblackops) talk.
Some reasons I’m a huge fan
- Each function/cmdlet is it’s own file.
- Includes several high quality tests out of the box.
- It auto generates your docs via PlayPS.
- Ready for deploying to the CI tool of your choice.
- Include VSCode configs that make developing your code easy!
Before using Stucco I had hand crafted my modules but bespoke code is prone to trivial errors. This becomes even more of an issue when you work on the code as a larger team.
psake and PowerShellBuild#
One of the things that makes Stucco extremely powerful is it’s use of psake and PowerShellBuild. psake is a build system in PowerShell and PowerShellBuild is a set of pre-defined tasks for psake. Both of these are Brandon’s projects as well!
psake allows for easy extensibility and PowerShellBuild lays down a strong set of foundational tasks.
Your Entry Point#
After you create your first Stucco module you’ll be using the .\build.ps1
script for essentially all your work. The tasks are called with the -Task
parameter. So as you write your code and you want to test, you would just call
the same build script with the Test task and everything happens.
What’s everything? It cleans up previous builds, stages your files, builds your documentation, runs script analyzer, and tests your code. If you run the Publish task you’ll get all the same steps but then you’ll find your modules in the PSGallery! It’s that easy.
VSCode Tasks#
With the build script being the pivotal point for you to do your work, it makes sense that exposing those commands is critical. This was another huge feature for me. VSCode has a concept called tasks that you can call through the Command Palette or via Shortcuts. Stucco includes all the tasks that come from PowerShellBuild as VSCode tasks.
What’s that mean for you the developer? Write code. Hit shortcut run test. Rinse and repeat. It makes taking on Test Driven Development (TDD) very easy. See Run Your First Test to see an example.
Enough talk! Let do!#
At a high level we’ll be doing the following
- Install Stucco
- Create your GitHub repo and check it out
- Create your Stucco module
- Run your Test
- Commit your code
- Prep for PSGallery
- Publish your module
There are some tweaks for other repositories/CI systems but if you’re goal is to write public modules, I found this to be pretty easy.
Install Stucco#
Install-Module StuccoHonestly that could be the whole thing. Under the hood Stucco depends on all the necessary modules so when you install Stucco it’ll pull down it’s requirements.
GitHub Repository#
If you don’t already have a GitHub account go ahead and sign up. I’ll skip on the details since there are several articles online to explain how and some best practices.
You’ll want to create a new repository for your module. So click on New.
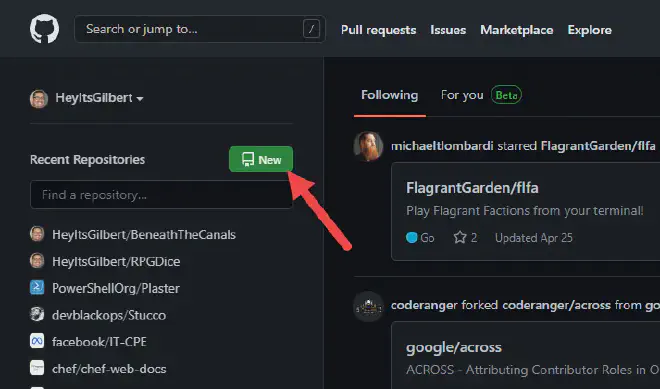
Once you have your repository you’ll want to give a name and a description. Then you will check it out on your machine where you have Stucco installed.
Create Your Modules#
Now you can create you module in your repo folder. It’s as simple… New-StuccoModule. Here’s an Example.
$ New-StuccoModule

cmdlet New-StuccoModule at command pipeline position 1
Supply values for the following parameters:
DestinationPath: .
  ____  _           _
 |  _ \| | __ _ ___| |_ ___ _ __
 | |_) | |/ _` / __| __/ _ \ '__|
 |  __/| | (_| \__ \ ||  __/ |
 |_|   |_|\__,_|___/\__\___|_|
                                            v1.1.3
==================================================
Enter the name of the module: ExampleModule
Enter a description of the module: An example
Enter the version number (1.2.3) for the module (0.1.0):
Enter your full name (Gilbert Sanchez):
Select a license for your module
[A] Apache  [M] MIT  [N] None  [?] Help (default is "M"):
Do you want to include a Code of Conduct?
[Y] Yes  [N] No  [?] Help (default is "N"):
Do you want to include MkDocs support?
[Y] Yes  [N] No  [?] Help (default is "N"):
Will you be using PowerShell classes?
[Y] Yes  [N] No  [?] Help (default is "Y"):
Do you want to use PlatyPS for help documentation?
[Y] Yes  [N] No  [?] Help (default is "Y"):
Do you want to include VSCode dev container support?
[Y] Yes  [N] No  [?] Help (default is "N"):
Do you want to include CI/CD support?
[A] AppVeyor  [P] Azure Pipelines  [H] GitHub Actions  [G] GitLab CI  [J] Jenkins CI  [M] MJenkins CI(MultiStage)  [N] None  [?] Help (default is "H"):
Destination path: /Users/gsanchez/repos/ExampleModule
Creating an opinionated high-quality PowerShell module with psake tasks and GitHub meta documents
.
   Create ExampleModule/ExampleModule.psd1
   Create .gitignore
   Create .gitattributes
   Create build.ps1
   Create psakeFile.ps1
   Create requirements.psd1
   Create .github/workflows/CI.yaml
   Create .github/CONTRIBUTING.md
   Create .github/ISSUE_TEMPLATE.md
   Create .github/PULL_REQUEST_TEMPLATE.md
   Create CHANGELOG.md
   Create README.md
   Create ExampleModule/Classes/classA.ps1
   Create ExampleModule/Private/GetHelloWorld.ps1
   Create ExampleModule/Public/Get-HelloWorld.ps1
   Create tests/Help.tests.ps1
   Create tests/Manifest.tests.ps1
   Create tests/Meta.tests.ps1
   Create tests/MetaFixers.psm1
   Create tests/ScriptAnalyzerSettings.psd1
   Create .vscode/extensions.json
   Create .vscode/settings.json
   Create .vscode/tasks.json
   Create LICENSE
   Create docs/en-US/about_ExampleModule.help.md
   Create ExampleModule/ExampleModule.psm1

Your new PowerShell module project [ExampleModule] has been created
If you follow the prompts you’ll get the right files. Easy! Next you’ll want to check out the files and layout.
Some key ones are…
Build.ps1: I mentioned this above. This is the work horse of the whole process.Requirements.ps1: PSDepends (which the build file loads) uses this to setup your environment and setup any needed files/modules.psakeFile.ps1: The psake configuration.
Run Your First Test#
You now have the “Hello World” version of the module. It can actually compile and give you a Hello World cmdlet. That should be good enough for testing.
Let’s run the Test task. You can find it under Terminal -> Run Task -> Test.
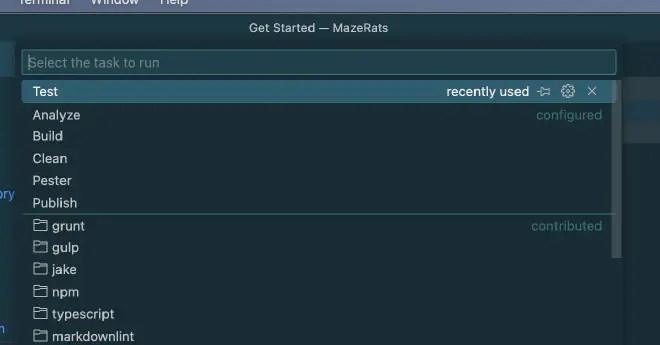
At this point you’ll see the build output. You can see how all the dependant tasks are executed before testing.
./build.ps1 -Task Test
Task: INIT

Build System Details:
Build Module:       PowerShellBuild:0.6.1
PowerShell Version: 7.3.0

Environment variables:
BHPSModulePath      /Users/gsanchez/repos/ExampleModule/ExampleModule
BHProjectName       ExampleModule
BHPSModuleManifest  /Users/gsanchez/repos/ExampleModule/ExampleModule/ExampleModule.psd1
BHBuildNumber       0
BHProjectPath       /Users/gsanchez/repos/ExampleModule
BHBuildSystem       Unknown
BHModulePath        /Users/gsanchez/repos/ExampleModule/ExampleModule
BHBuildOutput       /Users/gsanchez/repos/ExampleModule/Output/ExampleModule/0.1.0
Task: CLEAN

Task: STAGEFILES

Task: GENERATEMARKDOWN

WARNING: [Update-MarkdownHelp] 01/08/2023 15:37:27 Path '/Users/gsanchez/repos/ExampleModule/docs/en-US' does not contain any markdown files.
Task: GENERATEMAML

Task: BUILDHELP

Task: PESTER

Pester v5.3.3

Starting discovery in 3 files.
Discovery found 21 tests in 288ms.
Running tests.

Running tests from '/Users/gsanchez/repos/ExampleModule/tests/Help.tests.ps1'
Describing Test help for Get-HelloWorld
  [+] Help is not auto-generated 61ms (36ms|25ms)
  [+] Has description 10ms (9ms|1ms)
  [+] Has example code 18ms (16ms|1ms)
  [+] Has example help 4ms (2ms|1ms)
 Context Parameter Value
   [+] Has description 8ms (5ms|3ms)
   [+] Has correct [mandatory] value 23ms (22ms|1ms)
   [+] Has correct parameter type 6ms (5ms|1ms)

Running tests from '/Users/gsanchez/repos/ExampleModule/tests/Manifest.tests.ps1'
Describing Module manifest
 Context Validation
   [+] Has a valid manifest 6ms (4ms|2ms)
   [+] Has a valid name in the manifest 18ms (17ms|1ms)
   [+] Has a valid root module 9ms (5ms|4ms)
   [+] Has a valid version in the manifest 19ms (15ms|4ms)
   [+] Has a valid description 10ms (7ms|3ms)
   [+] Has a valid author 13ms (10ms|3ms)
   [+] Has a valid guid 48ms (45ms|3ms)
   [+] Has a valid copyright 42ms (3ms|38ms)
   [+] Has a valid version in the changelog 5ms (3ms|1ms)
   [+] Changelog and manifest versions are the same 7ms (5ms|2ms)

Describing Git tagging
  [!] Is tagged with a valid version 3ms (0ms|3ms)
  [!] Matches manifest version 1ms (0ms|1ms)

Running tests from '/Users/gsanchez/repos/ExampleModule/tests/Meta.tests.ps1'
Describing Text files formatting
 Context File encoding
   [+] No text file uses Unicode/UTF-16 encoding 4ms (3ms|2ms)
 Context Indentations
   [+] No text file use tabs for indentations 4ms (2ms|1ms)
Tests completed in 1.16s
Tests Passed: 19, Failed: 0, Skipped: 2 NotRun: 0
Task: ANALYZE

Task: TEST


psake succeeded executing ./psakeFile.ps1

Task: BUILD TIME REPORT
Name             Duration
----             --------
Init             00:00:00.086
Clean            00:00:00.002
StageFiles       00:00:00.169
GenerateMarkdown 00:00:00.399
GenerateMAML     00:00:00.260
BuildHelp        00:00:00.001
Build            00:00:00.000
Pester           00:00:01.954
Analyze          00:00:00.626
Test             00:00:00.000
Total:           00:00:03.609
You can see all the steps and how long they took. Nice!
Commit Your Code#
Now let’s publish our code. I prefer to check in the initial version and add each feature in separate commits but that’s just me.
git add .
git commit -m "Initial commit!"
git push
Setup PSGallery#
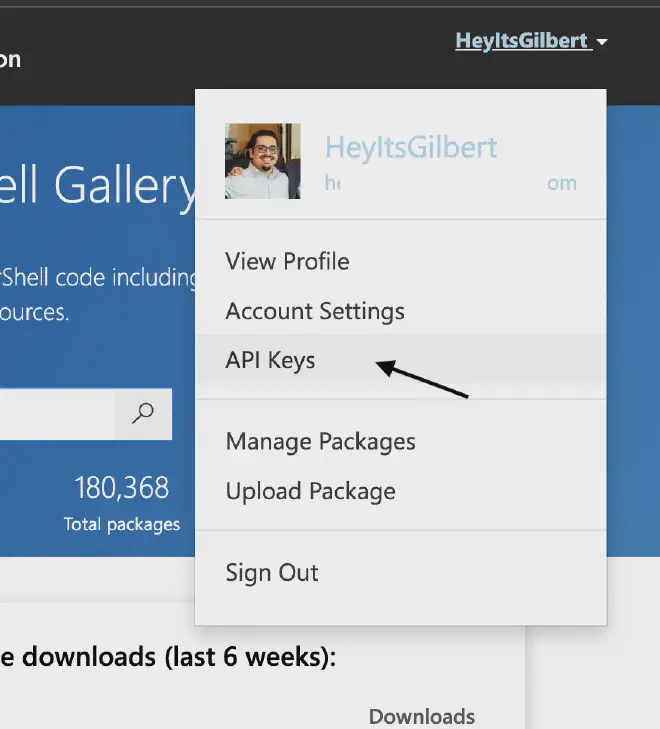
Once you have some versions checked into your repository on GitHub, you will eventually want to publish. First let’s create an API key on the PowerShell Gallery.
- Login to PSGallery
- Create API keys
- Copy them to your password vault.
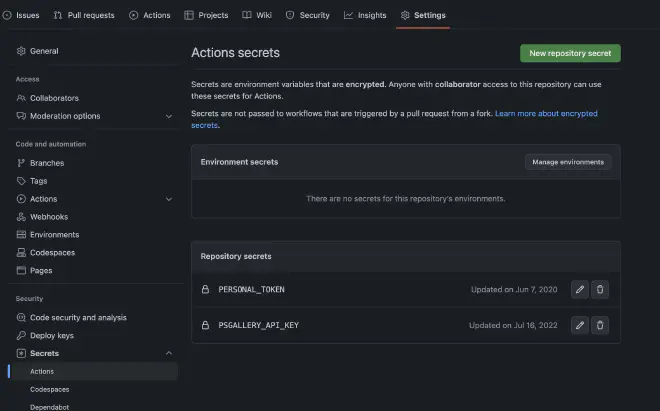
With your key handy you’ll want to add it to GitHub.
- Go to your new repo and click the Settings pane
- You want to go to Secrets and then Actions
- Name it
PS_GALLERY_KEYand paste
Publish Your Module!#
With you API key in your GitHub secrets you’re not ready to publish from GitHub. I would recommend creating a publish workflow on GitHub. You can use mine as an example: publish.yaml.
My workflow does a few convenient things
- Uses Chrissy LeMaire’s psmodulecache to speed up the builds
- Checks if the version is already published
- If it’s newer, it attempts to Publish with the Publish task
Wrap Up#
And that’s it! You now have a module that’s testable, open source, and automatically published to the PowerShell Gallery!
There are so many more cool details I could go over but I don’t want this to run longer then it already has. If there was anything unclear, please let me know by adding a comment or messaging me on the various linked social medias. I hope this was helpful and I would love to see what you publish!
References#
- My Stucco Presentation - Doc
- My Stucco Presentation - Slides
- Stucco on GithHb
- Plaster on GitHub
- PowerShell Module Cache GitHub Action
Cover Photo by Avel Chuklanov on Unsplash
