

This is part 2 of my controlling a cheap LED adventure. In part 1 we looked at the various components needed and just a smidge about turning up an MQTT broker.
In the following I’ll be going over the MQTT client on my desktop, how to add the light to the MQTT broker, and how I track the state in Home Assistant
MQTT Configuration#
So in my last post I mentioned spinning up an MQTT broker docker container but I
didn’t really go into how to configure the client. The Arduino code calls out
subscribing to a homeassistant/binary_sensor/office/lightning but what is that
really doing?
MQTT is a Pub/Sub client. You can have things subscribe to changes OR have them publish changes. This makes it easy to code vs writing out something to run in a loop.
For HomeAssistant to recognize devices you’ll need to add some configuration for
the component. We want to create a simple JSON blob that contains information
about your sensor. Here I create an object called office_esp. On my Ubuntu box
I run the following to create my configuration topic.
mosquitto_pub -h 192.168.138.900 -p 1883 -t "homeassistant/binary_sensor/office/config" -m '{"name": "office_esp", "device_class": "light", "state_topic": "homeassistant/binary_sensor/office/lightning"}'For mosquitto pub, you have the host ip (-h), port (-p), topic (-t), and
message (-m). The JSON itself will contain name, device_class,
state_topic. The last tells HomeAssistant what to watch for the state.
Checkout the HomeAssistant docs for appropriate device_class
https://www.home-assistant.io/integrations/binary_sensor/.
Important note: If you send a blank message, that will delete the topic.
Home Assistant#
So with some data in your MQTT broker, you can now point your home assistant setup to it.
- Add the MQTT integration
- You’ll be prompted to enter a broker address, port, username and password (optional).
- And that’s it!
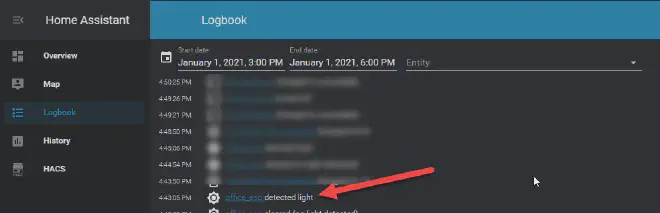
If you have your broker configured, you can try to set the state of your device. Once you do that you can check the logbook and see if it appears.
mosquitto_pub -h 192.168.138.900 -p 1883 -t "homeassistant/binary_sensor/office/lightning" -m "ON"Should result in:
HomeAssistant default MQTT discovery happens under homeassistant path prefix
and approved component name which should have made this process easier. See:
https://www.home-assistant.io/docs/mqtt/discovery/#motion-detection-binary-sensor.
PowerShell Client#
Luckily PowerShell is built on .Net which means we can use .Net libraries if they’re available. I found an article by Jack Gruber (PowerShell and MQTT) where he walks through a few examples of using MQTT with PowerShell. The first obvious thing is the grab the M2Mqtt library.
We load the DLL and start a connection to the broker with:
// Load the library. Make sure the path matches where you have your dll.
Add-Type -Path "M2Mqtt.Net.dll"
// This takes the broker's IP
$MqttClient = [uPLibrary.Networking.M2Mqtt.MqttClient]("192.168.138.900")
// Start the connection
$Mqttclient.Connect([guid]::NewGuid())
The next thing we’ll do is write a simple do while loop where we check our code until we exit.
do {
  // Some code here...
} while ($True)
So what do we want to do? We want to check if certain applications are
running. Applications such as video conferencing software.
We can use Get-Process to take a look at the current process. Now, it’s
possible the process isn’t running so we should tell Get-Process to just
quietly continue. If we count the results we can assume that more then 0 will
mean we’re running video conferencing software.
$PublishPath = "homeassistant/binary_sensor/office/lightning"
do {
    $proc = Get-Process -Name "Notepad" -ErrorAction SilentlyContinue
    if($proc.Count -gt 0){
        if ($status -ne "ON") {
            $MqttClient.Publish($PublishPath, [System.Text.Encoding]::UTF8.GetBytes("ON"))
            $status = "ON"
        }
    } else {
        if ($status -ne "OFF") {
            $MqttClient.Publish($PublishPath, [System.Text.Encoding]::UTF8.GetBytes("OFF"))
            $status = "OFF"
        }
    }
    Start-Sleep 5
} while ($True)
Client v1#
So the first version has some tweaks. We get all the processes running and the
check if any of our $procs show up. The $procs is an array where we can add
multiple executables (i.e. BlueJeans, Zoom, Discord, etc.). We then only
Publish to the broker if the state has changed. This should reduce the noise.
Add-Type -Path "M2Mqtt.Net.dll"
$MqttClient = [uPLibrary.Networking.M2Mqtt.MqttClient]("192.168.138.900")
$Mqttclient.Connect([guid]::NewGuid())
## Prompt for list of process or load from config
$procs = @(
    'notepad'
)
do {
    $proc = $null
    $all_procs = Get-Process -ErrorAction SilentlyContinue
    $proc = $all_procs | Where-Object { $procs -contains $_.Name }
    if($proc.Count -gt 0){
        if ($status -ne "ON") {
            $MqttClient.Publish("homeassistant/binary_sensor/office/lightning", [System.Text.Encoding]::UTF8.GetBytes("ON"))
            $status = "ON"
        }
    } else {
        if ($status -ne "OFF") {
            $MqttClient.Publish("homeassistant/binary_sensor/office/lightning", [System.Text.Encoding]::UTF8.GetBytes("OFF"))
            $status = "OFF"
        }
    }
    Start-Sleep 5
} while ($True)
$MqttClient.Disconnect()
Obviously this pretty rough around the edges but my goal will be to turn this into a nice clean module. The module will hopefully install itself as a service, and store it’s config on disk.
We’ll see how many naps the baby takes to get this done…
